
Flask Part 1: Introduction
Hello again, everyone. Today, we’re starting a series of posts that will help you understand Flask, a lightweight web framework for Python. Throughout this series, we’ll explore its main features, how to set up a basic environment, and how to build simple web applications. We’ll have more posts in the future diving into more advanced topics, but today, we’ll focus on the fundamentals. For example, what Flask is, why you should use it, and how to get started. If you already have some experience with Flask, you can skip this post or read it to see if there’s something you didn’t know.
What is an API?
Before diving into Flask, we need to define what we’re going to do with it. Today, we’re going to build an API. An API (Application Programming Interface) is a set of rules and protocols that allow different applications to communicate with each other. In simple terms, an API defines how different software components should interact.
A great analogy to understand what an API is is to think of it as a menu in a restaurant. The menu provides a list of dishes you can order, along with a description of each dish. When you specify what you want from the menu, the kitchen (the system) prepares your order and brings it to you. You don’t need to know how the food is prepared; you just need to know what’s available and how to order it. Similarly, an API provides a list of operations that developers can use, along with a description of what they do. Developers don’t need to know how the API is implemented; they just need to know what operations are available and how to use them.
Another concept we should understand is the client-server model. In a client-server architecture, the client is the application or device that requests services or resources, while the server is the application or device that provides those services or resources. The client and server communicate over a network, usually using standard protocols like HTTP.
The client sends a request to the server, which processes the request and returns a response. This architecture allows for a separation of concerns, as the client handles the user interface and user experience, while the server handles data processing and resource management. A common example of a client-server architecture is a web application, where the web browser acts as the client and the web server acts as the server.
“Okay, Raul, that’s all very interesting, but why should I learn what an API is, or what do we need it for?” Well, it’s simple: most modern applications rely on APIs to function. For example, when you use a social media app on your phone, that app is likely communicating with a server via an API to get and send data. The same goes for many other applications, such as messaging apps, e-commerce apps, and productivity apps. Learning to build and consume APIs is an essential skill for modern developers. Furthermore, as I mentioned earlier, it allows for a separation of concerns, which makes applications easier to maintain and scale.
Introduction to Flask
What is Flask?
Flask is a web microframework for Python that allows developers to create web applications quickly and easily. It was created by Armin Ronacher and released in 2010 as part of the Pocoo project. Flask is known for its simplicity, flexibility, and ease of use, making it a popular choice for developers of all experience levels.
A “micro-what”? First, let’s define what a framework is, and that will give us a solid foundation to understand what a microframework is. A framework is a set of tools, libraries, and conventions that facilitate software development by providing a predefined structure and common solutions to recurring problems. Frameworks allow developers to focus on the business logic of their application instead of worrying about low-level technical details. That’s the formal definition. But to understand it better, we can think of a framework as a set of LEGO pieces. When you build something with LEGO, you have a variety of pieces and tools you can use to create different structures. A framework works similarly by providing a set of reusable tools and components that developers can use to build applications more efficiently. For example, with Django, another Python framework, you have built-in tools to handle databases, user authentication, and URL routing, which makes creating complex web applications easier. As my grandfather would say, “if it’s already been done, why reinvent the wheel?” This is really the philosophy behind frameworks.
With the definition of a framework clear, we can define what a microframework is. A microframework is a type of web framework that provides a minimal structure and a basic set of tools for building web applications. Unlike full-fledged frameworks, which include a wide range of built-in functionalities, microframeworks focus on offering only the essential features needed to create web applications, allowing developers to have more control and flexibility over the architecture and dependencies of their application. Flask is a popular example of a microframework due to its simplicity and ease of use. I would add that it’s ideal for small to medium-sized projects, rapid prototypes, and applications that require significant customization. In Flask’s case, there’s no problem at all, as it comes with the bare minimum, and you can then add the libraries you need for your project—maximum flexibility, as I said.
Why Flask for beginners?
If you’re somewhat familiar with the programming world, you’ll know that there are many web frameworks for Python, the most well-known being Flask, Django, and FastAPI. Each has its own advantages and disadvantages, but Flask is an excellent choice for beginners for several reasons:
-
Simplicity and Ease of Use: Flask has a gentle learning curve and a simple syntax, making it easy for beginners to understand how it works and start building applications quickly.
-
Clear and Complete Documentation: Flask’s official documentation is extensive and well-organized, making it easy for beginners to find the information they need to learn and solve problems.
-
Flexibility and Customization: Flask allows developers to choose the tools and libraries they want to use, giving them the freedom to customize their application to their specific needs.
-
Active Community and Abundant Resources: Flask has an active community of developers who contribute tutorials, extensions, and support, making it easy for beginners to find help and resources to learn.
I don’t use Django because it’s too complex for beginners; it has a steeper learning curve and comes with many built-in features that can be overwhelming for new developers.
FastAPI is an excellent choice for building fast and efficient APIs, but it can be a bit more advanced for beginners due to its focus on static typing and asynchronous features. Flask, on the other hand, offers an ideal balance between simplicity and functionality, making it an accessible and powerful option for those starting their journey in web development with Python. That’s why I’ve chosen it for this first post in the series. Besides, we’ll cover basic concepts here that you can later apply to any other framework or language, like Node.js, Ruby on Rails, etc.
Installation and Setup
Getting started with Flask is very simple. First, make sure you have Python installed on your system. You can check this with the following command:
python3 --versionNote: On some systems, especially Windows, you might need to use python instead of python3. However, I recommend using python3 whenever possible, as python often refers to the outdated Python 2.
If for some reason you don’t have Python installed, you can download it:
- Windows: https://www.python.org/downloads/windows/
- macOS: https://www.python.org/downloads/macos/
- Linux: Use your distribution’s package manager, for example, on Ubuntu:
sudo apt-get install python3
Once you have Python installed, the next step is to verify that you have pip, which is Python’s package manager. It usually comes installed by default with Python, but you can check with:
pip3 --versionIf you don’t have it installed, you can follow the instructions here: https://pip.pypa.io/en/stable/installation/
But as I said, you probably have it.
Now, let’s create a virtual environment for our project. This is a good practice to isolate your project’s dependencies and avoid conflicts with other Python installations on your system. This is especially useful if you’re working on multiple projects that may require different versions of packages, and it also ensures you don’t have version or package conflicts. To create a virtual environment, navigate to the folder where you want to create your project and run:
python3 -m venv venvThe first venv is the command to create a virtual environment, and the second is the name of the folder where the virtual environment will be stored. You can change it if you want, but venv is a commonly used name.
And to activate the virtual environment:
- Windows:
venv\Scripts\activate- macOS/Linux:
source venv/bin/activateOnce the virtual environment is created and activated, the next step is to install Flask. You can do this easily using pip with the following command:
pip install FlaskAnd with that, you have Flask installed in your virtual environment. To verify that Flask has been installed correctly, you can run:
python3 -m flask --versionIf everything went well, you should see the version of Flask you’ve installed.
Now we’ll create the requirements.txt file. This file is a convention in Python projects for listing the project’s dependencies. This makes it easy to install all the necessary dependencies in another environment or machine with a single command. To create the file, simply run:
pip freeze > requirements.txtWe’ll also create a .gitignore file to ensure we don’t upload our virtual environment to a Git repository. You can create a file named .gitignore in the root of your project and add the following line:
venv/And finally, we’ll create a file named app.py, which will be the main file for our Flask application. You can create this file in the root of your project.
touch app.pyAnd open it with your favorite code editor. Add this to the app.py file:
# Import the Flask class from the flask module
# This is the main class we'll use to create our web application
from flask import Flask

# Create an instance of the Flask application
# __name__ tells Flask the name of the current module
# Flask uses this to know where to look for files like templates and static files
app = Flask(__name__)

# Define a route using the @app.route() decorator
# '/' means this function will run when someone visits the root of our site
# For example: http://localhost:5000/
# A decorator in Python is a way to modify a function's behavior
# For example, @app.route('/') tells Flask that this function handles requests to the '/' route
@app.route('/')
def hello():
    """
    This function is called a 'view function'
    It runs every time someone makes a GET request to '/'
    What this function returns is what the user will see in their browser
    """
    return "Hello, world!"

# This condition checks if we are running this file directly
# (not importing it from another file)
if __name__ == '__main__':
    # Start the Flask development server
    # debug=True means:
    # - If there are errors, they will be shown in the browser
    # - If you change the code, the server will automatically restart
    # - NEVER use debug=True in production for security reasons
    app.run(debug=True)
3. HTTP Fundamentals
HTTP Methods (GET, POST, PUT, DELETE)
HTTP methods are a set of verbs that indicate the desired action to be performed on a specific resource on the web. The most common methods are:
-
GET: Used to request data from a specific resource. It’s the most common method and is used to retrieve information without modifying it. For example, when you visit a webpage, your browser sends a GET request to the server to get the content of that page.
-
POST: Used to send data to a server to create or update a resource. Unlike GET, POST can modify the server’s state. For example, when you submit a form on a webpage, a POST request is usually used to send the data to the server.
-
PUT: Used to update an existing resource or create a new one if it doesn’t exist. Unlike POST, which can create multiple resources, PUT is idempotent, meaning that making the same request multiple times will have the same effect as making it once. For example, if you’re updating a user’s information in a database, you would use a PUT request.
-
DELETE: Used to delete a specific resource. Like PUT, DELETE is idempotent. For example, if you want to delete a blog post, you would send a DELETE request to the server.
Basic Status Codes (200, 201, 404, 500)
HTTP status codes are standard responses that web servers send to clients (like browsers or applications) to indicate the result of an HTTP request. Here are some of the most common status codes and their meanings:
-
200 OK: Indicates that the request has been processed successfully and the server has returned the requested information. It’s the most common status code and is used for successful GET requests.
-
201 Created: Indicates that the request has been processed successfully and a new resource has been created as a result. This code is commonly used in responses to POST requests that create new resources on the server.
-
404 Not Found: Indicates that the server could not find the requested resource. This can happen if the URL is incorrect or if the resource has been deleted. It’s one of the most well-known status codes and is commonly displayed when a webpage doesn’t exist.
-
500 Internal Server Error: Indicates that the server encountered an unexpected error that prevented it from completing the request. This status code is a sign that something has gone wrong on the server, but it doesn’t provide specific details about the problem.
Basically, we can divide HTTP status codes into five main categories:
Although 1xx codes exist, we won’t be using them for basic APIs like the one we’re building.
- 2xx: Success, whether the request was processed correctly or a resource was created.
- 3xx: Redirection, for example, 301 Moved Permanently or 302 Found. Although these are more commonly used in web pages than in APIs.
- 4xx: Client Error, for example, 400 Bad Request, 401 Unauthorized, 403 Forbidden, and 404 Not Found.
- 5xx: Server Error, for example, 500 Internal Server Error, 502 Bad Gateway, and 503 Service Unavailable.
Headers and Body
Headers and the body are two fundamental components of HTTP requests and responses that allow communication between clients and servers on the web.
Headers: Headers are metadata that provide additional information about the HTTP request or response. They are at the beginning of the request or response and consist of key-value pairs. Headers can include information such as the content type (Content-Type), content length (Content-Length), cookies, authentication, among others. For example, a common header in an HTTP request is “User-Agent,” which indicates the browser or client making the request.
Body: The body is the part of the HTTP request or response that contains the actual data being sent or received. In a request, the body can contain data such as forms, files, or JSON, depending on the HTTP method used (e.g., POST or PUT). In a response, the body usually contains the requested content, such as HTML, JSON, images, etc. The body is optional in some requests (like GET) but mandatory in others (like POST).
4. JSON as a Data Format
What is JSON?
JSON (JavaScript Object Notation) is a lightweight text-based format for data interchange. It is easy for humans to read and write, and easy for machines to parse and generate. JSON is based on a syntax that is a subset of JavaScript, but it is language-independent, meaning it can be used in a wide variety of programming languages.
Advantages of JSON
-
Readability: JSON is easy to read and understand, which facilitates collaboration between developers and debugging problems. As long as it is well-formatted and structured.
-
Lightweight: JSON has a simple structure and uses fewer characters than other formats like XML, which reduces the size of the transmitted data and improves application speed.
-
Compatibility: JSON is compatible with most modern programming languages, making it easy to use in different environments and platforms.
-
Complex Data Structures: JSON can represent complex data structures, such as nested objects and arrays, making it suitable for a wide variety of applications.
Although JSON is not the only option for data interchange, it is the most popular and widely used in modern web development. Other formats include XML, YAML, and CSV, but JSON has become the de facto standard due to its aforementioned advantages.
Basic Structure
JSON uses a structure based on key-value pairs and supports various data types, including objects, arrays, strings, numbers, booleans, and nulls. Here is a basic example of the JSON structure:
{
  "name": "John",
  "age": 30,
  "isStudent": false,
  "address": {
    "street": "123 Fake St",
    "city": "Springfield"
  },
  "phoneNumbers": ["123-456-7890", "987-654-3210"]
}
If we compare it to XML, another common data format, JSON is generally more compact and easier to read. Here is an example of the same dataset in XML:
<person>
  <name>John</name>
  <age>30</age>
  <isStudent>false</isStudent>
  <address>
    <street>123 Fake St</street>
    <city>Springfield</city>
  </address>
  <phoneNumbers>
    <phoneNumber>123-456-7890</phoneNumber>
    <phoneNumber>987-654-3210</phoneNumber>
  </phoneNumbers>
</person>
As you can see, JSON is more concise and easier to read compared to XML, which makes it a preferred choice for data interchange in modern web applications.
5. Routes and Decorators
@app.route()
If you’ve been following the post, you’ve already seen a basic example of how to define a route in Flask using the @app.route() decorator. This decorator is used to link a specific URL to a function in your Flask application. When a user visits that URL, the associated function is executed and returns a response. For example, in the code we saw earlier:
@app.route('/')
def hello():
    return "Hello, world!"
Here, @app.route('/') indicates that the hello() function will be executed when someone visits the root of our website (http://localhost:5000/). The function returns the text “Hello, world!”, which is what the user will see in their browser.
HTTP Methods in Routes
We’ve already seen the different HTTP methods (GET, POST, PUT, DELETE). In Flask, you can specify which HTTP methods a route can handle using the methods parameter in the @app.route() decorator. By default, a route only handles GET requests. Here’s an example of how to define a route that handles both GET and POST:
from flask import request

@app.route('/tasks', methods=['GET', 'POST'])
def handle_tasks():
    if request.method == 'GET':
        return "List all tasks"
    elif request.method == 'POST':
        return "Create a new task"
In this example, the /tasks route can handle both GET and POST requests. Inside the handle_tasks() function, we check the request method using request.method and respond accordingly.
Although I personally don’t like to handle multiple methods in a single function, I prefer to have separate functions for each method, but this is a matter of personal preference and project context.
URL Parameters
So far, we’ve seen basic routes, but you’ll often want to handle routes that include dynamic parameters. For example, if you’re building an API to manage tasks, you might want a route that allows you to get, update, or delete a specific task by its ID. In Flask, you can define routes with parameters using the <type:name> syntax. Here’s an example:
@app.route('/tasks/<int:id>', methods=['DELETE'])
def delete_task(id):
    return f"Delete task with ID {id}"
Here, the <int:id> parameter indicates that we expect an integer as part of the URL, and this value will be passed to the delete_task() function as the id argument. If a user visits the URL /tasks/5, the function will be executed with id equal to 5.
Obviously, we would need to add checks to ensure that the task with that ID exists before trying to delete it, but we’ll see that in future posts. At the end of the post, you’ll have the complete code for the API we’ve built today. Do you dare to add checks and improvements?
7. Complete CRUD with In-Memory Data
GET - List all tasks
For now, we’ll simply store the tasks in a list in memory. In a real project, you would probably use a database, but to keep things simple and focus on Flask, we’ll use a list.
from flask import Flask, request, jsonify

app = Flask(__name__)
tasks = []

@app.route('/tasks', methods=['GET'])
def list_tasks():
    return jsonify(tasks)
As you can see, we use the jsonify method to convert our list of tasks into a JSON format that can be sent as a response. This is for the reasons we discussed earlier about JSON. Additionally, jsonify also automatically sets the Content-Type header to application/json, which tells the client that the response is JSON.
POST - Create a new task
@app.route('/tasks', methods=['POST'])
def create_task():
    new_task = request.json
    new_task['id'] = len(tasks) + 1  # Assign ID automatically
    tasks.append(new_task)
    return jsonify(new_task), 201
Here, we use request.json to get the data sent in the body of the POST request. Then we add the new task to our list and return the created task with a 201 (Created) status code. We should add checks here to ensure that the sent data is valid, but we’ll cover that in future posts.
GET by ID - Get a task
@app.route('/tasks/<int:id>', methods=['GET'])
def get_task(id):
    for task in tasks:
        if task['id'] == id:
            return jsonify(task)
    return jsonify({"error": "Task not found"}), 404
Here, we search for the task by its ID in the list and return it if we find it. If not, we return a 404 (Not Found) error.
PUT - Update a task
@app.route('/tasks/<int:id>', methods=['PUT'])
def update_task(id):
    updated_data = request.json
    for task in tasks:
        if task['id'] == id:
            task.update(updated_data)
            return jsonify(task)
    return jsonify({"error": "Task not found"}), 404
DELETE - Delete a task
@app.route('/tasks/<int:id>', methods=['DELETE'])
def delete_task(id):
    for task in tasks:
        if task['id'] == id:
            tasks.remove(task)
            return jsonify({"message": "Task deleted"})
    return jsonify({"error": "Task not found"}), 404
8. Testing with Postman
Configure Requests
To test our API, a very popular tool is Postman. Postman is an application that allows developers to create, share, test, and document APIs easily. With Postman, you can send HTTP requests to your API and see the responses, which makes debugging and development easier.
But you can also do it with other tools like curl or requests in Python. Here’s an example of how to do it with curl:
curl -X GET http://localhost:5000/tasksOr with requests in Python:
import requests
response = requests.get('http://localhost:5000/tasks')
print(response.json())
Test Each Endpoint
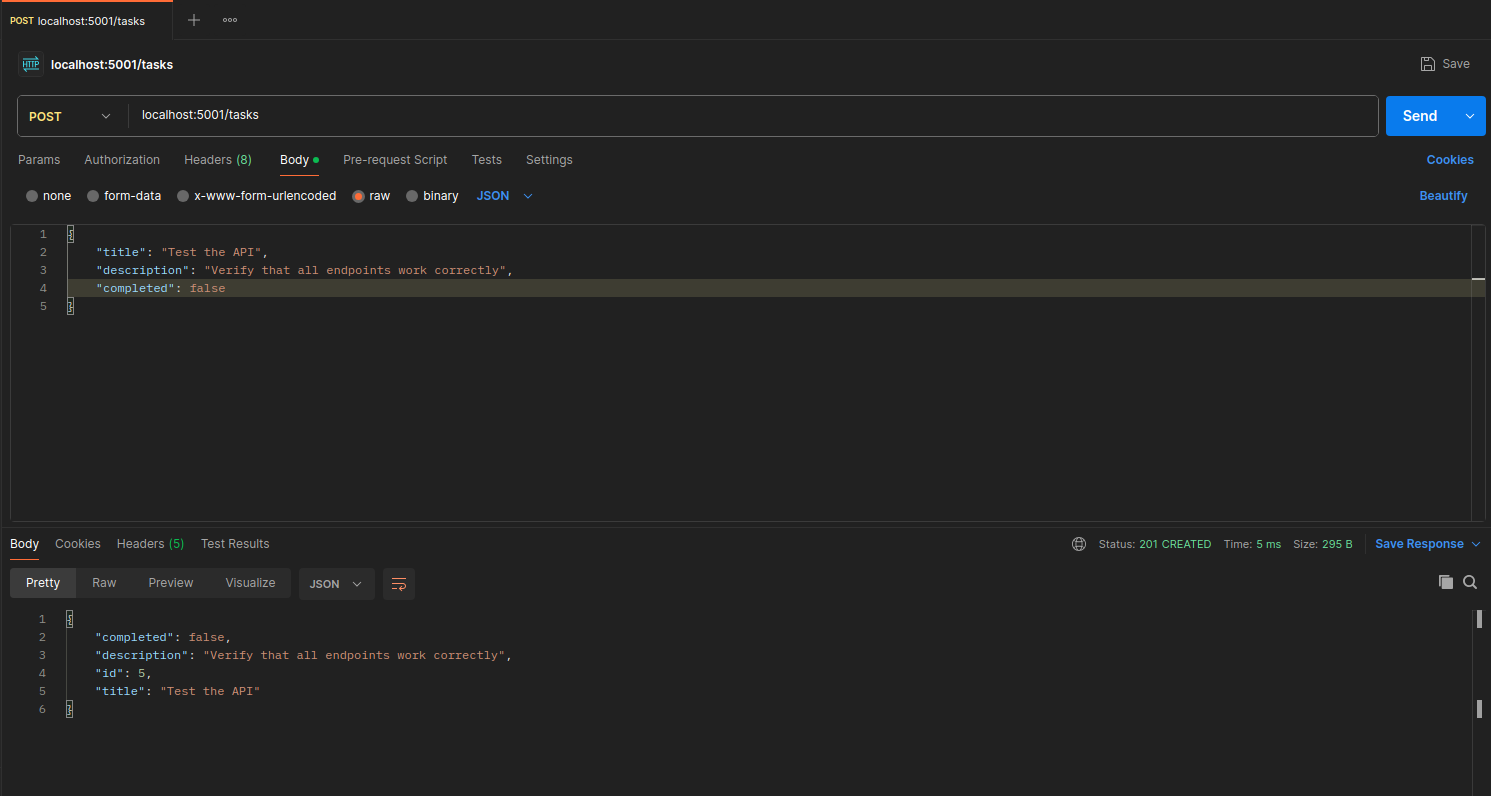
To test the endpoints we’ve created, simply open Postman and create a new request for each of the HTTP methods we’ve implemented (GET, POST, PUT, DELETE). Make sure to configure the URL correctly (e.g., http://localhost:5000/tasks to list all tasks) and to select the appropriate HTTP method.
Also, if you check out the GitHub repository I’ve linked at the end of the post, I’ve left everything we’ve done plus some extra things so you can try it out directly. Including tests.
Verify Responses
For each request you send, Postman will show you the server’s response, including the HTTP status code, headers, and body. Make sure to verify that the responses are as expected. For example, when you create a new task with a POST request, you should receive a 201 status code and the created task in the response body.
9. Basic REST Concepts
What is REST?
REST (Representational State Transfer) is an architectural style for designing web services that is based on a set of principles and constraints. It was introduced by Roy Fielding in his doctoral dissertation in 2000. REST is commonly used to build APIs that allow communication between clients and servers via HTTP.
The API we’ve built today is a RESTful API, as it follows the principles of REST. These principles include:
-
Client-Server: The REST architecture is based on a clear separation between the client and the server. The client is responsible for the user interface and user experience, while the server is responsible for data processing and resource management.
-
Stateless: Each request from the client to the server must contain all the information necessary to understand and process the request. The server should not store any client state between requests. This means that each request is independent and does not depend on previous requests.
-
Cacheable: Server responses should be labeled as cacheable or non-cacheable. If a response is cacheable, the client can store the response and reuse it for future requests, which improves performance and reduces the load on the server.
-
Uniform Interface: REST defines a uniform interface between the client and the server, which simplifies the architecture and improves interoperability. This includes the use of resources identified by URLs, the use of standard HTTP methods (GET, POST, PUT, DELETE), and the representation of resources in standard formats like JSON or XML.
-
Layered System: The REST architecture can be composed of multiple layers, where each layer has a specific function. This allows for scalability and flexibility in the system design.
APIs are usually divided based on two main factors: by what they return (JSON, XML, HTML) and by how they are designed (REST, SOAP, GraphQL). Today, we’ve seen a REST API that returns JSON.
But as I said, there are also other API design styles like SOAP (Simple Object Access Protocol) and GraphQL. SOAP is an XML-based protocol that defines a set of rules for communication between applications, while GraphQL is a query language for APIs that allows clients to request exactly the data they need.
Our API is RESTful because it follows the principles of REST and uses HTTP as its communication protocol. Additionally, it returns data in JSON format, which is a lightweight and easy-to-use format for data interchange.
Resources and URIs
In a REST API, resources are the entities that are exposed through the API. Each resource must have a unique URI (Uniform Resource Identifier) that identifies it. For example, in our task API, we could have the following URIs:
/tasks: to access the collection of tasks./tasks/{id}: to access a specific task by its ID.
It’s important to follow good naming practices when defining resource URIs. Some recommendations are:
- Use plural nouns for resource names (e.g.,
/tasksinstead of/task). - Use hyphens to separate words in URIs (e.g.,
/completed-tasksinstead of/completedtasks). - Avoid using verbs in URIs, as the HTTP method (GET, POST, PUT, DELETE) already indicates the action to be performed on the resource.
And that’s all for today! In the next post in the series, we’ll dive deeper into more advanced topics such as data validation, error handling, and authentication. If you have any questions or suggestions, don’t hesitate to leave a comment. See you next time! By the way, before I forget, here’s the link to the GitHub repository with all the code we’ve written today plus some extra goodies so you can test it directly. Tests included. GitHub Repository