Git: A Complete Beginner's Guide
1. What is Git and why does it exist?
Let’s talk about Git.
Before jumping into commands, here’s a quick bit of history:
Git was created in 2005 by Linus Torvalds — yes, the same person who created Linux. At the time, the Linux kernel was a massive project with hundreds of contributors, and they needed a way to manage all those changes without stepping on each other’s toes. They were using a tool called BitKeeper, but a licensing dispute meant they had to find an alternative. In true Linux fashion, Torvalds just built his own.
Once Git was out, it spread through the developer community like wildfire and became the most widely used version control system in the world.
But wait — what even is a version control system (VCS)? It’s a tool that tracks changes to your code over time and lets you go back to any previous state. Think about it: we’ve all had folders that looked like this:
final_projectfinal_project_v2final_project_v2_REALfinal_project_v2_REAL_THIS_TIME
Git solves exactly that problem.
You might wonder if there are alternatives to Git. There are — SVN and Mercurial are the most popular ones. But Git has become the industry standard because of its flexibility and speed.
The biggest difference between SVN and Git is that SVN is centralized (there’s one server that holds all the code) while Git is distributed (every developer has a complete copy of the repository on their machine). This makes Git much faster and lets you work offline.
As for Mercurial, I came across a post that sums it up brilliantly: it describes Git as MacGyver (flexible, powerful, built from small composable pieces) and Mercurial as James Bond (elegant, fast, but more rigid). If you’re curious: Git vs Mercurial: Please Relax.
FAQ
Do I need to know how to code to use Git? Nope. Git is language-agnostic. You can use it with Python, JavaScript, Java, or even plain text documents. All you need is a terminal.
Are Git and GitHub the same thing? Not at all. Git is the tool that runs on your computer. GitHub is a web platform where you host your repos. Think of it like the difference between a Word document and Google Drive. We’ll cover GitHub in detail in the next post.
Is Git only for big projects? Definitely not. I use it for small personal projects too. The moment you have more than one file and catch yourself thinking “I wish I could go back to how this was yesterday”, Git is already useful.
2. The 3 states of a file in Git
This is the most important concept in all of Git. Once you understand this, everything else makes sense.
When you work with Git, any file in your project can be in one of three states:
- Working Directory: This is your regular folder where you edit files.
- Staging Area: A “preparation zone” where you decide which changes will go into your next commit.
- Repository: The permanent history. Once something is committed here, it’s saved forever.
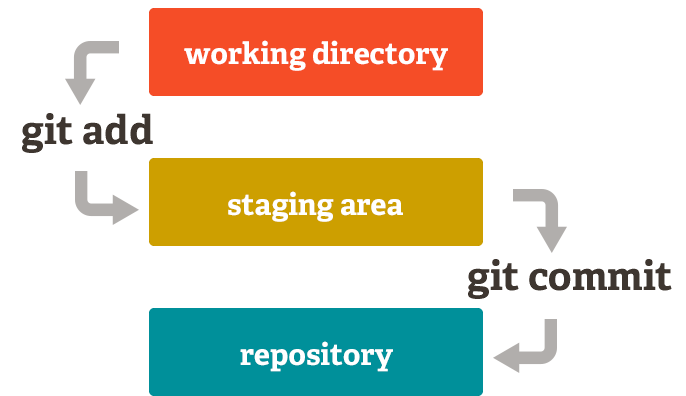
How do you move between them?
When you create or modify a file, it lives in the Working Directory. To tell Git you want to include that change in your next commit, you move it to the Staging Area with git add. Once you’re happy with everything in staging, you run git commit and those changes are saved permanently in the Repository.
We’ll cover how to reverse changes at each stage later on — no need to worry about that now.
A good analogy: it’s like packing a suitcase. Your clothes are on the floor (Working Directory), you fold them and put them in the bag (Staging Area), then you zip the bag shut (commit). Done.
FAQ
Why does the Staging Area exist? Can’t I just commit directly? It might seem like an extra step, but staging is what gives you precise control over what goes into each commit. Say you’ve edited 5 files but only want to commit 2 of them — staging makes that trivial. Without it, you’d have to commit everything or nothing.
I ran git add . and I want to undo it — how?
Use git restore --staged .. This unstages everything without touching the actual changes in your files. Nothing is lost.
3. Initial setup
# Set your name and email (they'll appear on every commit you make)
git config --global user.name "Your Name"
git config --global user.email "you@email.com"

# See your full current config
git config --list
The very first thing you need to do before using Git is set up your name and email. This information gets attached to every commit you make, so your teammates will know who wrote what.
Adding --global applies the config to all Git repositories on your machine. Without it, the setting only applies to the current project. This is handy if you want a different email for work projects vs personal ones.
By default, Git uses Vim as its text editor — which is powerful but notoriously hard to escape if you don’t know it. The “how to exit Vim” question has millions of views on Stack Overflow for a reason. To switch to something friendlier like VS Code, run:
git config --global core.editor "code --wait"This will open VS Code whenever Git needs you to write something (like a commit message), and it’ll wait until you close that tab before continuing.
FAQ
Is it mandatory to set name and email? Technically, Git will let you make commits without it, but the output will look messy and some team workflows may break. Just do it from day one.
I’m stuck in Vim and I can’t get out — help!
Type :q! and press Enter to exit without saving. If you want to save first, use :wq. Better yet, set VS Code as your editor using the command above and you’ll never have to deal with Vim again.
4. Starting a project: git init and git clone
# Option A: Create a fresh repository from scratch
git init my-project
cd my-project

# Option B: Download an existing repository from GitHub
git clone https://github.com/username/repository.git
There are two ways to get started with Git on a project:
git init: Creates a brand new repository in your current folder. Use this when starting a project from scratch, or when you want to add Git to an existing codebase.git clone: Downloads an existing repository from a remote server like GitHub. This is what you’ll do most of the time when joining a project.
Both are valid depending on the situation. When you run git init, Git creates a hidden .git folder inside your project. That folder is the brain of your repository — it holds the entire history, configuration, and everything Git needs. You’ll never need to touch it, but if you delete it, you lose all your history.
By default, the remote repository your project is connected to is called origin. It’s just an alias — a shorthand for the full URL so you don’t have to type it every time.
FAQ
I ran git init in the wrong folder. How do I undo it?
Just delete the .git folder it created: rm -rf .git. That removes the repository without touching your actual files. Heads up: if you already had commits in there, they’re gone.
Can I clone a private repo? Yes, but you need access. The most common ways to authenticate are via SSH or a GitHub personal access token. We’ll cover that in the GitHub post.
5. The .gitignore file: what Git should never see
# Example .gitignore
node_modules/
.env
*.log
dist/
Every project should have a .gitignore file. This tells Git which files and folders to completely ignore. Without it, it’s very easy to accidentally commit things you shouldn’t — like node_modules/ (which can be hundreds of megabytes) or .env files containing your passwords and API keys.
You can find ready-made templates at gitignore.io or in GitHub’s official gitignore repo. If you create the repo directly on GitHub, it’ll also offer to add one for you automatically.
The typical things you don’t want to commit fall into these categories:
- Environment and sensitive config:
.env,config.local.js, anything with passwords or API keys. - Dependencies:
node_modules/,vendor/, etc. These are installed by your package manager, not committed. - Log files: Any runtime-generated
.logfiles. - OS-specific files:
.DS_Store(macOS),Thumbs.db(Windows), etc. - Build or cache output:
dist/,build/,.cache/, etc.
The golden rule: create your .gitignore before your first commit. Fixing it after the fact is a pain.
FAQ
I accidentally committed my .env — what do I do?
First: rotate any credentials that were in that file, because they’re now exposed. Then run git rm --cached .env to stop tracking it and add it to your .gitignore. If you want to completely remove it from history, that requires more advanced tools like git filter-repo.
Can I ignore a file that Git is already tracking?
Adding it to .gitignore alone won’t work once Git is already tracking a file. You first need to run git rm --cached filename to untrack it, then add it to .gitignore.
6. The daily workflow
6.1 Checking the status of your repo
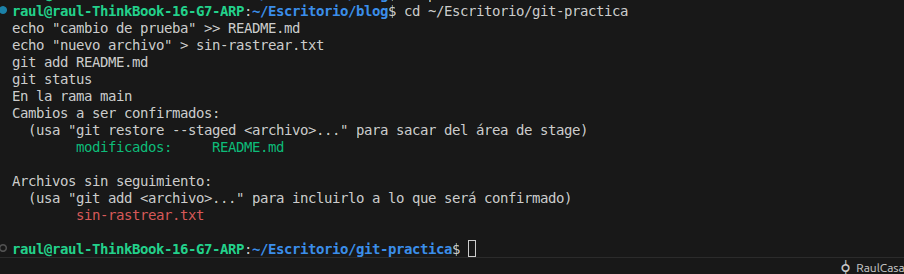
git statusgit status is probably the command you’ll use more than any other in Git. Before doing anything — and I mean anything — it’s good practice to run it first to see the current state of your files. It’ll show you which files have been modified, which are staged, and which aren’t being tracked at all.
The colors tell you everything:
- Red: The file has been modified or created but isn’t staged yet.
- Green: The file is in the Staging Area and ready to commit.
6.2 Adding changes to staging
# Stage a specific file
git add file.txt

# Stage all changes at once
git add .

# Interactively stage parts of a file (hunk by hunk)
git add -p file.txt
Once you’ve checked the status, you can start staging changes with git add:
git add file.txt: Stages a specific file.git add .: Stages everything that’s been modified. Be careful — you might not always want to stage everything.git add -p file.txt: Stages individual chunks of a file interactively. Really useful when you’ve made multiple changes to one file but only want to commit some of them.
In practice git add . is the most common, but always pair it with a git status check before committing so you know what you’re actually including.
6.3 Making a commit
# Commit with a short inline message
git commit -m "feat: add login form"

# Open your editor to write a longer, more detailed message
git commit

# Quickly commit already-tracked files (skips git add)
git commit -am "fix: typo in README"

# Modify the last commit (message or add a forgotten file)
git commit --amend
Once your changes are staged, it’s time to commit. A commit is Git’s way of saving a snapshot of your project at that point in time. Use git commit -m "message" to create one with a short message, or just git commit to open your editor for a longer description.
Every commit has a unique identifier called a SHA — a 40-character hash like a1b2c3d4.... You’ll see these in git log and you can use them to reference specific commits in other commands.
For commit messages, I strongly recommend following the Conventional Commits spec. It’s a simple convention that makes your history much more readable:
feat:— a new featurefix:— a bug fixdocs:— documentation changeschore:— maintenance tasksrefactor:— code restructuring without changing behavior
And git commit --amend? That’s your best friend when you forgot to include a file or made a typo in the message. It lets you modify the last commit without creating a new one. Just don’t use it if you’ve already pushed the commit — that rewrites history and causes problems for your teammates.
6.4 Connecting to and pushing to a remote
# See which remotes your repo is connected to
git remote -v

# Push changes to the main branch
git push origin main

# The first time you push a new branch
git push -u origin my-branch
When you want to upload your local commits to GitHub (or any remote), you use git push. Before doing that, you can check what remote your repo is connected to with git remote -v.
origin is the default name Git gives to your remote. You can rename it, but origin is the convention that everyone follows. When you run git push origin main, you’re telling Git: “Push the commits from my local main branch to the remote called origin.”
The first time you push a new branch, you need the -u flag to set up tracking. From then on, a plain git push is all you need.
6.5 Pulling changes from the remote
# Download AND merge changes into your current branch (most common)
git pull

# Download only, without merging (to inspect first)
git fetch

# See what the fetch brought in before merging
git diff origin/main
When you’re working in a team, other developers are constantly pushing changes to the remote. To download those changes and integrate them into your current branch, use git pull. This is equivalent to running git fetch followed by git merge in one step.
git fetch on its own just downloads the new information without touching your code. It’s useful when you want to see what others have done before committing to merging.
The golden rule: always run git pull before you start working in the morning. It keeps you in sync and prevents a lot of unnecessary merge conflicts.
FAQ
I tried to git push and got an error — why?
Most likely, someone else pushed changes to the remote since your last pull, and your local branch is behind. Run git pull first to integrate their changes, then try pushing again.
What happens if I git pull with uncommitted changes?
Git will warn you and refuse to pull until you deal with your local changes. Your options are: commit what you have, or use git stash to set it aside temporarily, pull, then apply the stash back.
What’s the real difference between git pull and git fetch?
git fetch downloads the information from the remote but doesn’t touch your working files. git pull does the same and then automatically merges those changes. If you want to review before merging, use git fetch followed by git diff origin/main.
7. Viewing your history
# Full commit history
git log

# Compact history (most useful)
git log --oneline

# Visual branch tree
git log --oneline --graph --all

# See the full changes in a specific commit
git show abc1234

# See who changed each line of a file, and when
git blame file.txt
The commit history is one of the most important things Git gives you. It’s a complete record of every change ever made, who made it, and why.
git log on its own can be a bit overwhelming. --oneline condenses it to one line per commit, and --graph --all adds a visual ASCII tree of your branches — it looks really cool and is genuinely useful for understanding where things are.

git show lets you inspect the full diff of a specific commit. Just pass it the SHA: git show abc1234.
git blame shows you who changed each line of a file and in which commit. It’s invaluable when you’re trying to understand why a piece of code is the way it is.
FAQ
The log has too much info — how do I filter it?
You can filter by author (--author="Name"), by date (--since="2 weeks ago"), or search by message keyword (--grep="fix"). Example: git log --oneline --author="Raul" --since="1 month ago".
How do I go back to a previous commit without losing what I have now?
Don’t blindly use git checkout. The safest approach is to create a new branch from that commit: git switch -c recovery-branch abc1234. That lets you inspect the old code without touching your current branch.
8. Comparing changes with git diff
# See changes NOT yet in staging
git diff

# See changes that ARE already staged
git diff --staged

# Compare two specific commits
git diff abc1234 def5678

# Compare against main
git diff main
git diff shows you what’s changed in your files. The output format takes a moment to get used to:
- Red lines are removed content.
- Green lines are added content.
The key difference to remember: git diff shows what’s in your Working Directory (not yet staged), while git diff --staged shows what’s in the Staging Area (about to be committed).
Pro tip: VS Code and most modern editors visualize this natively with colored gutter indicators. If you use VS Code, the GitLens extension takes it to the next level — it shows historical blame info inline, directly in your editor.
FAQ
git diff shows nothing — why?
If you already ran git add, those changes are now staged. git diff (without flags) only shows unstaged changes. Switch to git diff --staged to see what’s in staging.
How do I compare my branch against main before merging?
Use git diff main..my-branch. This shows you exactly what you’ve changed relative to main, which is great for a quick pre-merge review.
9. Undoing things without panic
9.1 Temporarily saving your work
# Stash your current changes to switch tasks
git stash

# Bring them back
git stash pop

# List everything in the stash
git stash list
Here’s a scenario you’ll encounter constantly: you’re halfway through a feature when someone asks you to fix an urgent bug on a different branch. You’re not ready to commit yet. That’s exactly what git stash is for — it saves your in-progress changes to a temporary stack so you can switch contexts, then pop them back when you return. Think of it as pausing and resuming your work.
9.2 Reverting changes
# Discard changes to a file in the Working Directory
git restore file.txt

# Unstage a file (keeps your changes intact)
git restore --staged file.txt

# Tell Git to stop tracking a file (without deleting it from disk)
git rm --cached file.txt
This is the section that scares people the most when they first start with Git. The fear of “what if I break something and can’t undo it?” is very real. But here’s the thing: Git has mechanisms to undo almost any mistake.
The safest command is git restore. It discards local changes to a file without touching the commit history. If you want to unstage something first without losing your changes, use git restore --staged. And if you want Git to stop tracking a file entirely (without deleting it from your disk), git rm --cached is your command — especially useful when you forgot to add something to .gitignore.
FAQ
I made a commit I shouldn’t have — how do I undo it? It depends on your situation:
- Not pushed yet:
git reset --soft HEAD~1undoes the commit but keeps your changes staged. - Want to scrap the changes too:
git reset --hard HEAD~1. Warning: this is destructive — the changes are gone. - Already pushed and don’t want to rewrite history:
git revert HEADcreates a new commit that undoes the previous one — the safe option for shared branches.
Does git restore permanently delete my changes?
Yes — git restore file.txt permanently discards uncommitted changes to that file and there’s no undo. Always run git status first so you know exactly what you’re about to throw away.
10. Branches: working in parallel
10.1 Creating and switching branches
# List all local branches
git branch

# Create a new branch
git branch my-feature

# Switch to a branch (modern syntax)
git switch my-feature

# Create and switch in one command
git switch -c my-feature

# Delete a branch (only if already merged)
git branch -d my-feature

# Force delete a branch
git branch -D my-feature
Branches are what make Git powerful for teams. A branch is an independent line of development — you can work on a new feature without touching the main codebase. The golden rule in any team: never commit directly to main.
The typical branch setup looks like this:
main: The production-ready branch. Always stable.develop: Integration branch where features are merged before going tomain.feature/name: Where you do your actual work.
git switch is the modern command for changing branches. You might also see git checkout -b in older tutorials — both work the same way, but git switch is clearer and more explicit.

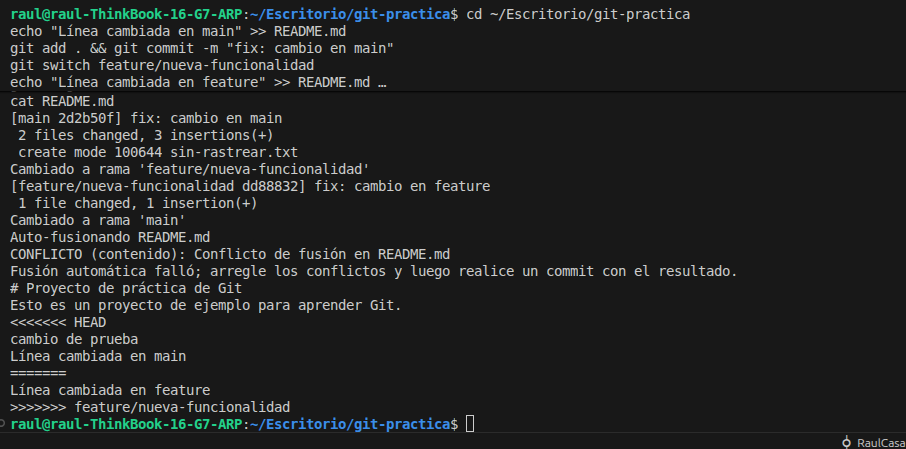
10.2 Merging branches with git merge
# Scenario: you want to merge "my-feature" into "main"
git switch main
git merge my-feature
When your feature is ready, you merge it back into main. Switch to the destination branch first, then run git merge with the source branch.
There are two types of merges:
- Fast-forward: Happens when the feature branch is directly ahead of the base branch, with no diverging commits. Git simply moves the pointer forward — no merge commit is created.
- Merge commit: Happens when there are diverging commits on both branches. Git creates a new commit that ties the two histories together.
And then there’s the dreaded merge conflict. A conflict happens when two branches have modified the same line of the same file. Git doesn’t know which version is correct, so it marks the conflict in your file like this:
<<<<<<< HEAD
This is what your current branch has
=======
This is what the branch you're merging in has
>>>>>>> feature/my-feature
To resolve it: open the file, choose which version to keep (or combine both), remove all the <<<<, ====, and >>>> markers, then run git add + git commit. It sounds scary, but after doing it a couple of times it becomes second nature.
FAQ
I made a bad merge and broke things — how do I undo it?
If the merge has its own commit, you can revert it with git revert -m 1 HEAD. If it was a fast-forward merge and you haven’t pushed yet, git reset --hard HEAD~1 will take you back to where you were.
When should I use --no-ff?
When you want the history to clearly show that a feature came from its own branch. With a regular fast-forward merge, the feature’s commits get mixed into main and lose their context. With --no-ff, it’s clear which commits belong to which feature — especially useful in team projects.
The conflict looks massive — where do I start?
Use VS Code. When you open a conflicted file, it shows both versions in colour with buttons to accept one, the other, or both. Way easier than editing the raw <<<< markers by hand.
11. Intro to GitHub (→ see the full GitHub post)
# Connect your local repo to a GitHub repository
git remote add origin https://github.com/your-username/your-repo.git

# Push your code for the first time
git push -u origin main
Git and GitHub are often confused, but they’re different things. Git is the version control tool running on your machine. GitHub is the cloud platform where you host your repos, collaborate with others, and run CI/CD pipelines.
To connect a local repo to GitHub:
- Create a new repository on GitHub (without initializing it with a README to avoid conflicts).
- Copy the repository URL.
- Link your local project:
git remote add origin URL. - Push your code:
git push -u origin main.
We’ll dive deep into GitHub in the next post — Pull Requests, Issues, Actions, and more.
FAQ
Is GitHub free? The free plan covers everything you need to get started: unlimited public and private repos, and collaboration with others. Paid plans add things like more CI/CD minutes and enterprise features.
Can I use alternatives to GitHub? Absolutely. GitLab and Bitbucket are the main alternatives. They all work on top of Git, so your skills transfer directly. GitHub dominates open source, but GitLab is excellent if you want to self-host your own platform.
12. Best practices and conventions
Now that we’ve covered the commands, here are some habits that will save you from a lot of headaches:
- Keep commits small and focused: One commit = one logical unit of work. Avoid the infamous “misc fixes” or “changes” commit messages.
- Use Conventional Commits: Prefixes like
feat:,fix:,docs:make your history far more readable and can be used to automate changelogs. - Never commit credentials: No tokens, no API keys, no
.envfiles. Even in private repos, don’t get into that habit. git pullfirst thing in the morning: Always sync with the remote before you start working to avoid painful conflicts later.- Use branches for everything:
mainshould always be in a deployable state. All development happens in feature branches. - Review before staging: Don’t blindly run
git add .. Check withgit statusfirst so you know exactly what you’re committing.
FAQ
Our team doesn’t use Conventional Commits — does it matter? It’s not mandatory, but you’ll notice the difference when a project has been running for months and you need to understand the history. At a minimum, agree on some internal convention and stick to it. Consistency beats perfection.
How many commits a day is normal? It really depends, but I personally prefer committing small and often. There’s no magic number. What matters is that each commit represents a single logical change — not a three-hour dump of everything you did.
13. Advanced tips and pro flags
We’re getting into the good stuff now. These commands and flags won’t come up every day, but when you need them, you really need them.
Useful flags on commands you already know
# See only the file names changed in a commit (no full diff)
git show --name-only abc1234

# Log with relative dates and author info
git log --oneline --format="%h %ad %s" --date=relative

# Merge without fast-forward: forces a merge commit even when it's not needed
# Useful for keeping branch history visible
git merge --no-ff feature/my-branch

# Squash merge: flattens all branch commits into one
# Very clean for small pull requests
git merge --squash feature/my-branch

# Stash only the staged changes (leave unstaged changes alone)
git stash --staged

# Diff a specific file between two branches
git diff main feature/my-branch -- file.py

# Blame with line range
git blame -L 10,25 file.py
git cherry-pick: grab a specific commit from another branch
git cherry-pick is one of those commands that, once you discover it, you wonder how you ever lived without. It lets you take a specific commit from any branch and apply it to your current branch — without doing a full merge.
# Apply a specific commit to your current branch
git cherry-pick abc1234

# Cherry-pick multiple commits at once
git cherry-pick abc1234 def5678

# Cherry-pick without auto-committing (leaves changes in staging)
git cherry-pick --no-commit abc1234
When to use it: imagine you have a feature/x branch with 10 commits, but there’s one critical bug fix in there that you need in main right now. Instead of merging the whole branch, you cherry-pick just that one commit.
git restore --source: grab a file from another branch or commit
This is a hidden gem that not many people know about. Instead of manually copying a file from one branch to another, you can ask Git to do it for you:
# Restore a file as it is on another branch
git restore --source=feature/new-feature utils.py

# Restore a file as it was at a specific commit
git restore --source=abc1234 utils.py

# Restore ALL files as they were at a specific commit (without moving HEAD)
git restore --source=abc1234 .
Perfect for when you’ve accidentally deleted something in your branch and you know it still exists somewhere else. Grab just the file you need instead of doing a full merge.
git checkout <hash> -- .: travel to a point in history without moving your branch
The syntax git checkout <hash> -- . copies the file state from that commit into your Working Directory and Staging Area, without moving your HEAD or changing branches. You’re looking at the past, but you’re still on your current branch:
# Restore all files to how they were at that commit
git checkout abc1234 -- .

# Restore a single file from that commit
git checkout abc1234 -- src/utils/helpers.py
The difference from git restore --source is mostly syntax: git checkout is the classic form, while git restore --source is the modern, more explicit version introduced in Git 2.23. Both do the same thing.
Heads up: after running this, your files will appear in staging. Run
git statusto see what changed and decide whether you want to commit it or discard it.
Bonus: other useful commands worth knowing
# Summary of lines added/removed per file
git diff --stat

# Find which commit introduced a specific string
git log -S "function_name" --oneline

# Track the history of a specific function in a file
git log -L :function_name:file.py

# Undo the last commit but keep the changes staged
git reset --soft HEAD~1

# Remove untracked files from the Working Directory (use with care!)
git clean -fd
14. Cheat Sheet: all the commands at a glance
| Command | What it does |
|---|---|
git config --global |
Set name and email |
git init |
Create a new repository |
git clone <url> |
Download a repository |
git status |
See the current repo state |
git add <file> |
Stage a specific file |
git add . |
Stage everything |
git commit -m "..." |
Create a commit |
git commit --amend |
Edit the last commit |
git push |
Upload commits to remote |
git pull |
Download and merge changes |
git fetch |
Download only (no merge) |
git log --oneline |
Compact commit history |
git log --oneline --graph --all |
Visual branch tree |
git show <sha> |
Full diff of a specific commit |
git diff |
Changes not yet staged |
git blame <file> |
Who changed each line, and when |
git stash |
Temporarily save work in progress |
git stash pop |
Restore stashed changes |
git restore <file> |
Discard local changes |
git restore --staged |
Unstage a file |
git rm --cached |
Stop tracking a file |
git branch |
List branches |
git switch -c <branch> |
Create and switch to a branch |
git merge <branch> |
Merge a branch |
git branch -d <branch> |
Delete a branch |
git remote -v |
See remote connections |
15. Conclusion and resources
Hopefully this post has given you a solid foundation for working with Git. The most important thing now is to practice — create a repo, make some commits, create branches, break things, and fix them. The commands start to feel automatic faster than you’d expect.
In the next post, we’ll go deep on GitHub: Pull Requests, Issues, GitHub Actions, and the collaboration workflows you’ll use every day.
Here are a few resources I’d genuinely recommend:
- Pro Git: The official Git book, free and incredibly thorough.
- Learn Git Branching: An interactive visual game for learning branches. Best way to wrap your head around merging and rebasing.
- Oh Shit, Git!: Real-world solutions to common Git disasters, written with humor. Bookmark this one.