
From Localhost to Production: A Guide to Publishing Your Website
From Localhost to Production: A Guide to Publishing Your Website
Publishing a website can seem complex, and it’s true there are many steps involved. But with a guide, it becomes much simpler. In this article, I’m going to explain how to publish your website and walk you through all the questions I had when I did it for the first time.
What Does It Mean to Publish a Website?
The first thing we need to understand is what “publishing a website” actually means. Publishing a website is the process of making your site accessible on the Internet. This involves uploading your site’s files to a web server, which is a computer that stores and serves your site’s files to visitors.
For everyone to be able to access your website, you need a domain name (like yoursite.com) and a web server to host your site’s files.
What Do I Need to Publish a Website?
To publish a website, you don’t actually need much. You simply need:
- Your Website: Yes, a bit obvious, but to upload your website, you need files to display your content. This can be HTML, CSS, JavaScript, images, etc. If you’re using a framework, you’ll need the files generated by it.
- A Web Server: A service that allows you to host your website. This can be your own server, a shared hosting service, or a cloud service.
- A Domain Name: A name that users can use to access your website, like
yoursite.com. This is optional but recommended to make your site easier to remember and access.
What Exactly is a Domain?
Okay, now that we know we need a domain, what is it? Everyone knows what a domain is, but do we really know what happens? Or how it works? In this section, I’ll dive a bit deeper into the topic.
First, I’ll define what a domain is. A domain is a unique address on the Internet that identifies a website. It’s what users type into their browser to access your site. For example, yoursite.com is a domain. In my case, mine is raulcasado.com. This domain is associated with an IP address, which is the unique address of a server on the Internet. When a user types your domain into their browser, the browser sends a request to the server associated with that IP address to get your website’s files. This is especially useful since no user wants to remember an IP address, and it’s much easier to remember a domain name like raulcasado.com than an IP address like 78.46.123.456.
Alright, now you probably have several questions, like who provides these domains? Can I generate a domain myself? How is a domain associated with a server? Do I own the domain? Well, we’re going to answer all these questions, as they are all very good and important.
Domains are managed by organizations called domain registrars. These organizations are responsible for selling and managing domain names. Some of the best-known registrars are GoDaddy, Namecheap, and Google Domains. When you buy a domain, you are paying for the right to use that name for a specific period (usually a year). This answers several questions we have, for example, who provides the domains? We’ve seen that it’s the domain registrars. Can I create a domain myself? No, as they must be registered by a domain registrar like Namecheap. Is the domain mine? Yes, but only for the period you’ve paid for. If you don’t renew the domain, you’ll lose the right to use it, and the domain will become available for someone else to buy. If you’re thinking of buying a domain, I recommend you do it through a trusted registrar and read the terms and conditions before buying. If you’ve been paying attention, you’ll have noticed I left one question unanswered: how is a domain associated with a server? Well, this is done through DNS records. DNS records are like a phonebook for the Internet. When you buy a domain, you can configure the DNS records to point to your web server’s IP address. This allows a browser to know which server to send the request to when someone types your domain.
Parts of a URL: Dissecting a Domain
Let’s use this example URL (non-functional):
https://blog.raulcasado.com:443/posts/how-i-got-my-website-online?utm_source=google&utm_medium=example#dns
A URL like this can be broken down as follows:
[protocol]://[subdomain].[domain].[TLD]:[port]/[path]?parameters#fragment
Protocol: https://
Indicates the type of connection. In this case, HTTPS (Secure HTTP). It could also be http://, ftp://, etc.
Subdomain: blog.
Allows separating parts of the site, like blog.raulcasado.com or admin.raulcasado.com.
Second-Level Domain (SLD): raulcasado
This is the name you choose. Together with the TLD, it forms the full domain: raulcasado.com.
Top-Level Domain (TLD): .com
This is the extension. It can be .com, .es, .dev, etc. Each TLD has its own purpose or origin.
Port: :443
Indicates the port used to connect to the server. 443 is the standard for HTTPS (80 for HTTP).
Path: /posts/how-i-got-my-website-online
Indicates which resource you want from the server. Here, we are accessing a specific blog post.
Query Parameters: ?utm_source=google&utm_medium=example
Optional. They are used to pass data to the server or tools like Google Analytics. In this case, they indicate that the visit came from Google and is part of an example.
Fragment: #dns
Used to jump directly to a specific section within the page. It is not sent to the server.
One question we left out is: what happens when I type a domain into my browser? Well, it’s more complex than it seems. But before I explain that, I need to explain what DNS is.
What is DNS?
Okay, we’ve talked a lot about DNS, but I’ve never really explained what it is. The DNS (Domain Name System) is like the Internet’s contact list.
Imagine you want to call your friend Goku, but instead of having his name saved on your phone, you only had his number: +34 123 456 789. It would be a pain to remember all those numbers, right? Especially for the pre-smartphone generation, but what if you had to remember everyone’s number? It would be chaos, right?
Well, that’s exactly what DNS does: it translates human-readable names (raulcasado.com) into machine-readable IP addresses (78.46.123.456).
How does DNS work?
The DNS system is organized like a hierarchical tree:
-
Root Servers: The “bosses” of the system. They know where to find information about each TLD (.com, .es, etc.).
-
TLD Servers: They know where to find information about specific domains within their extension. I’ll pause here for a moment, as it’s important to understand that TLDs are the domain extensions, like
.com,.es,.org, etc. For example, if you look upraulcasado.com, the TLD server for.comwill tell you where to find the information for theraulcasado.comdomain. Which, in our case, would be Namecheap, the domain registrar I bought it from. -
Authoritative Servers: These are the ones that actually know the IP address of your domain. These servers have the specific information for your domain. For example, if you look up
raulcasado.com, the authoritative server will tell you that the IP address is78.46.123.456.
The most important types of DNS records
A Record: Connects your domain to an IP address.
raulcasado.com → 78.46.123.456CNAME Record: Makes a subdomain point to another domain.
www.raulcasado.com → raulcasado.comMX Record: Tells the world where your email should be delivered.
mail for @raulcasado.com → mx.zoho.euTXT Record: For verifications and special configurations.
Domain verification, SPF, DKIM, etc.The @ symbol: Represents your root domain (without subdomains).
@ = raulcasado.com
www = www.raulcasado.com
blog = blog.raulcasado.com
Where are DNS records configured?
When you buy a domain, the registrar (Namecheap, GoDaddy, etc.) gives you access to a panel where you can configure these records. It’s like editing the Internet’s contact list for your domain.
The key is to understand that buying the domain and configuring where it points are two separate things. You can buy yoursite.com from Namecheap but have it point to a server from Netlify, Vercel, or wherever you want.
In summary: DNS is the system that makes it so when you type google.com, your browser knows to go look for the website at the IP address 142.250.185.78 (one of Google’s IPs).
What happens when I type a domain into my browser?
Let’s go step-by-step to see what happens when you type a domain into your browser.
- Browser Cache: When you type a domain into your browser, the first thing it does is check its local cache to see if it has recently resolved that domain. If it finds it, it uses the IP address stored in the cache. This is especially useful for speeding up the loading process of websites you visit frequently.
- Operating System Cache: If the browser doesn’t find the domain in its cache, it checks the operating system’s DNS cache. This cache stores recent domain resolutions to speed up the process. How long records stay in the OS cache depends on the system’s configuration and the DNS records themselves. This is known as TTL (Time To Live). TTL is like an expiration date; it tells the browser how long it can store that information before having to ask again.
- Query to the DNS Server: If the domain is not in the browser’s cache or the operating system’s cache, the browser sends a query to a DNS server. This server is responsible for resolving the domain and returning the corresponding IP address. The DNS server can be provided by your Internet Service Provider (ISP), or you can use a public DNS server like Google’s (8.8.8.8) or Cloudflare’s. But what if that domain isn’t found? Well, it could be that the domain doesn’t exist, that it was created recently and hasn’t propagated yet, or that there’s a problem with the DNS server. And if, say, Google doesn’t find the domain? Then it will start searching other DNS servers, following a hierarchy. First, it will query the root servers, then the top-level domain (TLD) servers, and finally the authoritative servers for the specific domain. This process can take a little time, but it’s usually fast.
- Response from the DNS Server: Once the DNS server finds the IP address corresponding to the domain, it sends that information back to the browser. The browser stores this IP address in its cache for future queries and proceeds to connect to the web server associated with that IP address.
- Connection to the Web Server: With the IP address in hand, the browser establishes a connection with the web server. This involves sending an HTTP (or HTTPS) request to the server to get the website’s files. The web server receives the request and responds by sending the necessary files to display the web page in the user’s browser.
- Page Rendering: Finally, the browser receives the files from the server and processes them to display the web page to the user. This includes interpreting the HTML, applying CSS styles, and executing any necessary JavaScript code for the page to function correctly.
Hosting: Where does my website live?
Alright, now that you’re a pro at domains, let’s talk about hosting. Hosting is the service that allows you to store your website on a server so it can be accessible on the Internet. It’s like the place where your website lives. There are different types of hosting, and each has its own features and advantages.
Types of Hosting
Here are some of the types of hosting I know of; if I’ve missed any, feel free to let me know and I’ll add it.
-
Shared Hosting: In this type of hosting, several websites share the same server and its resources. It’s an economical and easy-to-use option, ideal for small or personal websites. However, performance can be affected if other sites on the same server consume a lot of resources.
-
VPS (Virtual Private Server) Hosting: In a VPS, a physical server is divided into several virtual servers, each with its own dedicated resources. It offers more control and performance than shared hosting, but at a higher cost. It’s suitable for medium-sized websites or those that need more resources.
-
Dedicated Hosting: With this type of hosting, you have an entire server for your website. It offers maximum control and performance, but it’s also the most expensive. It’s ideal for large websites or applications that require a lot of resources.
-
PaaS (Platform as a Service): This type of hosting allows you to deploy applications without worrying about the underlying infrastructure. Providers like Heroku or Vercel offer PaaS, which makes deploying and scaling web applications easier.
-
Cloud Hosting: This type of hosting uses multiple cloud servers to host your website. It offers high availability and scalability, meaning your site can handle traffic spikes without issues. Providers like AWS, Google Cloud, and Azure offer cloud hosting services.
You also have other options like managed hosting, where the provider takes care of the server setup and maintenance, or self-managed hosting, where you are responsible for everything. Or static hosting, which is ideal for static websites and can be hosted on services like GitHub Pages. Or serverless hosting. Also, within a VPS, you can create your own Docker container and host your site in it, which could be considered a type of hosting.
And with so many types of hosting, how do I choose the best one for my website? Well, the choice of hosting depends on several factors, such as the size of your website, the traffic you expect to receive, and your budget. If you’re just starting out and have a small website, shared hosting can be a good option, or even platforms like Vercel or Netlify, which are super easy to integrate with GitHub and have very generous free plans that are more than enough for personal projects. If you expect higher traffic or need more control, consider a VPS or cloud hosting. And if you have a large website or a complex application, dedicated hosting may be the best option.
Price is also an important factor, as you can find options from free to hundreds of euros per month. So I recommend that you compare prices and features before making a decision. Here I’m going to pause for a moment to talk about the prices of domains and hosting. Domain prices vary depending on the registrar and the TLD you choose. For example, a .com domain can cost between 10 and 20 euros per year, while a .es domain can cost between 5 and 15 euros per year. Some registrars offer discounts for the first year, so it’s a good idea to compare prices before buying.
As for hosting, prices also vary depending on the type of hosting and the provider.
Shared hosting can cost between 3 and 10 euros per month, while a VPS can cost between 20 and 100 euros per month. Dedicated hosting can cost between 100 and 200 euros per month, depending on the resources you need. Cloud hosting can be more variable, as you pay for the resources you use, but you can find plans from 5 euros per month to hundreds of euros per month. So I recommend that you compare prices and features before making a decision. It’s also important to read reviews from other users to ensure that the provider you choose is reliable and offers good customer service.
Putting All the Pieces Together
Now that you understand domains, hosting, and DNS separately, let’s connect them. I’m going to show you exactly how I took my Astro project from localhost:4321 to raulcasado.com.
The Moment of Truth: My Real Process
1. Preparing the Project for Deployment
Do you need to run npm run build before uploading to Netlify?
NO! Netlify handles that automatically.
# This is just to test locally that the build works
npm run build
# But DO NOT upload the dist/ folder to GitHub
Prerequisites:
- Project on GitHub (source code only)
package.jsonwith configured scripts- Everything works locally with
npm run dev
Why not upload dist/?
The dist/ folder contains the final, optimized version of your site, ready for production. This folder is generated automatically by running the npm run build command. You should never upload this folder to your version control system (like Git) because it’s a build artifact, not source code. It’s like uploading the .exe of a compiled program instead of the C++ source code.
Your .gitignore file should include dist/ to prevent it from being tracked:
# ... other ignores
dist/
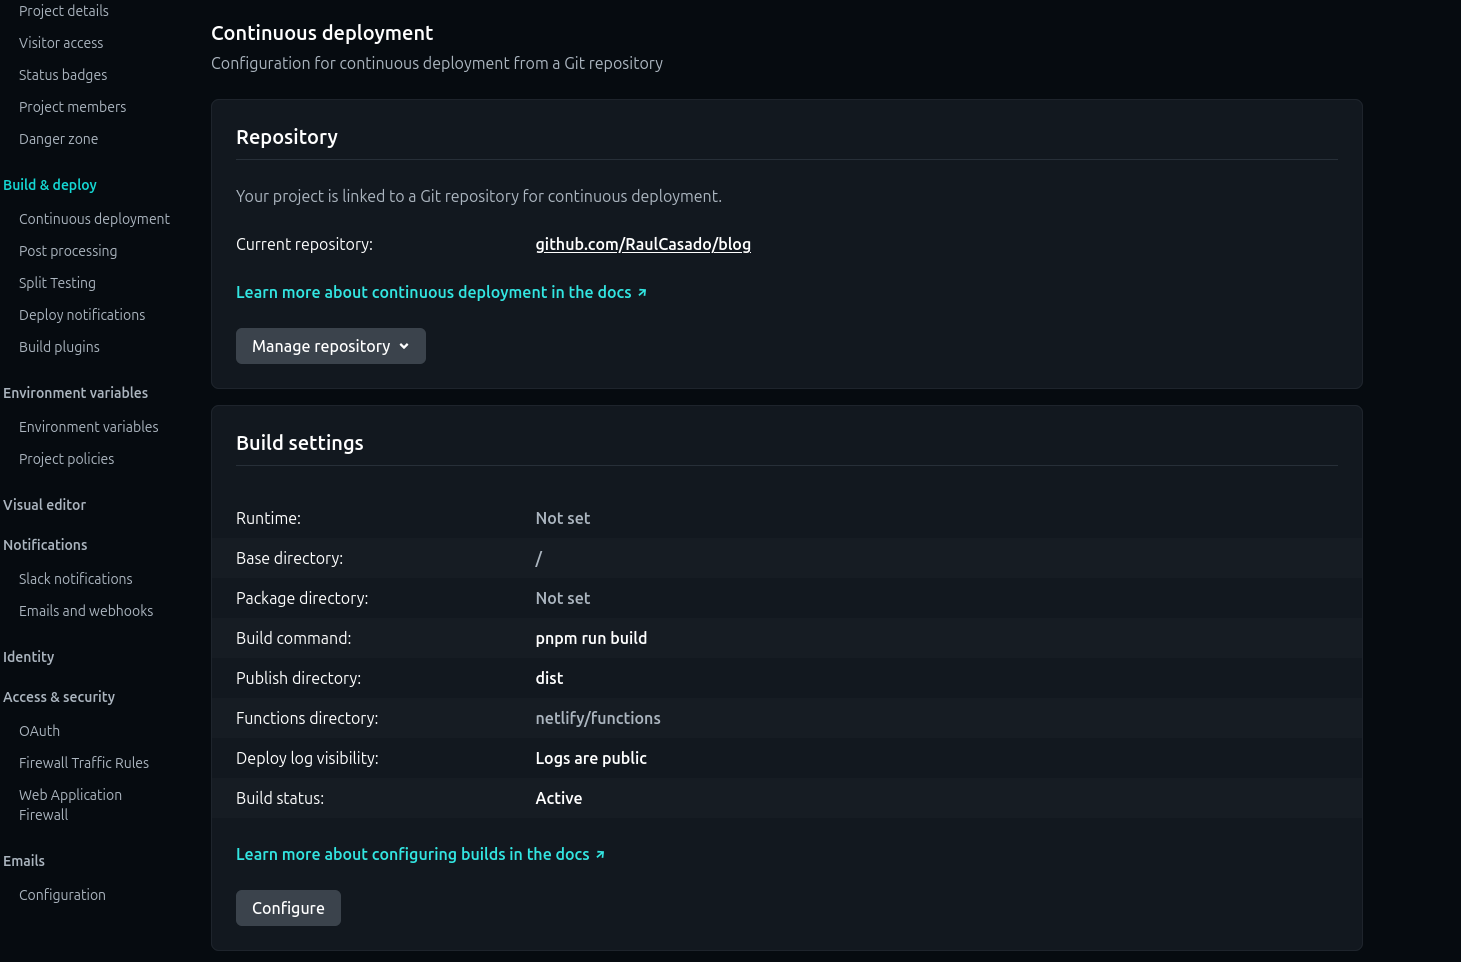
.astro/The correct workflow:
- You push only the source code to GitHub
- Netlify automatically detects the push
- Netlify runs
npm run buildon its servers - Netlify publishes the generated
dist/folder
2. Deploying on Netlify Step-by-Step
Why I chose Netlify:
- Generous free plan
- Perfect integration with GitHub
- Automatic SSL
- Automatic deployment on every push
The process:
-
Create an account on Netlify with GitHub
-
“Add new site” → “Import an existing project”
-
Select your repo from GitHub
-
Netlify automatically detects Astro and configures:
Build command: npm run build Publish directory: dist -
Automatic Deploy! In 2-3 minutes you have your temporary URL:
zealous-curie-123abc.netlify.app
My site is now online!** But with an ugly URL. Time to connect my domain.
3. Connecting My Domain with Netlify
On Netlify:
- Site settings → Domain management
- “Add custom domain” → I type
raulcasado.com - Netlify verifies that I own the domain (it might ask for a temporary TXT record)
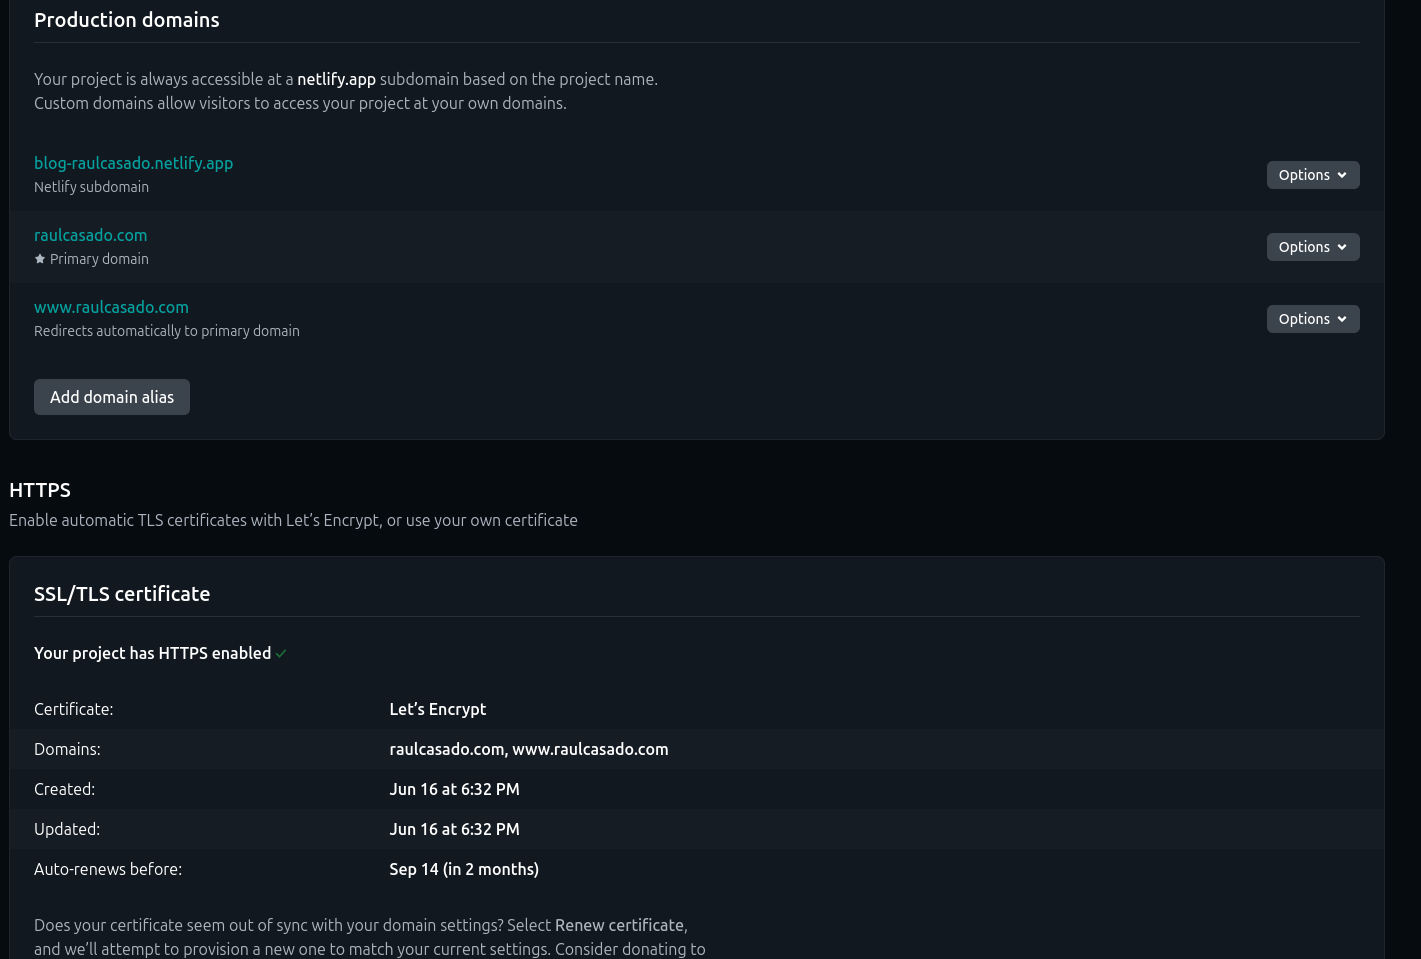
- Netlify configures everything automatically
Here you can see a screenshot of how the final configuration looks in Netlify once you’ve added your custom domain:
DNS Propagation:
- The DNS updates gradually across the Internet
- It can take from a few minutes to 48 hours
- You can check the status with tools like whatsmydns.net
Once propagated, my site was accessible at raulcasado.com.
You can check the propagation of your domain with the dig command in your terminal:
dig raulcasado.com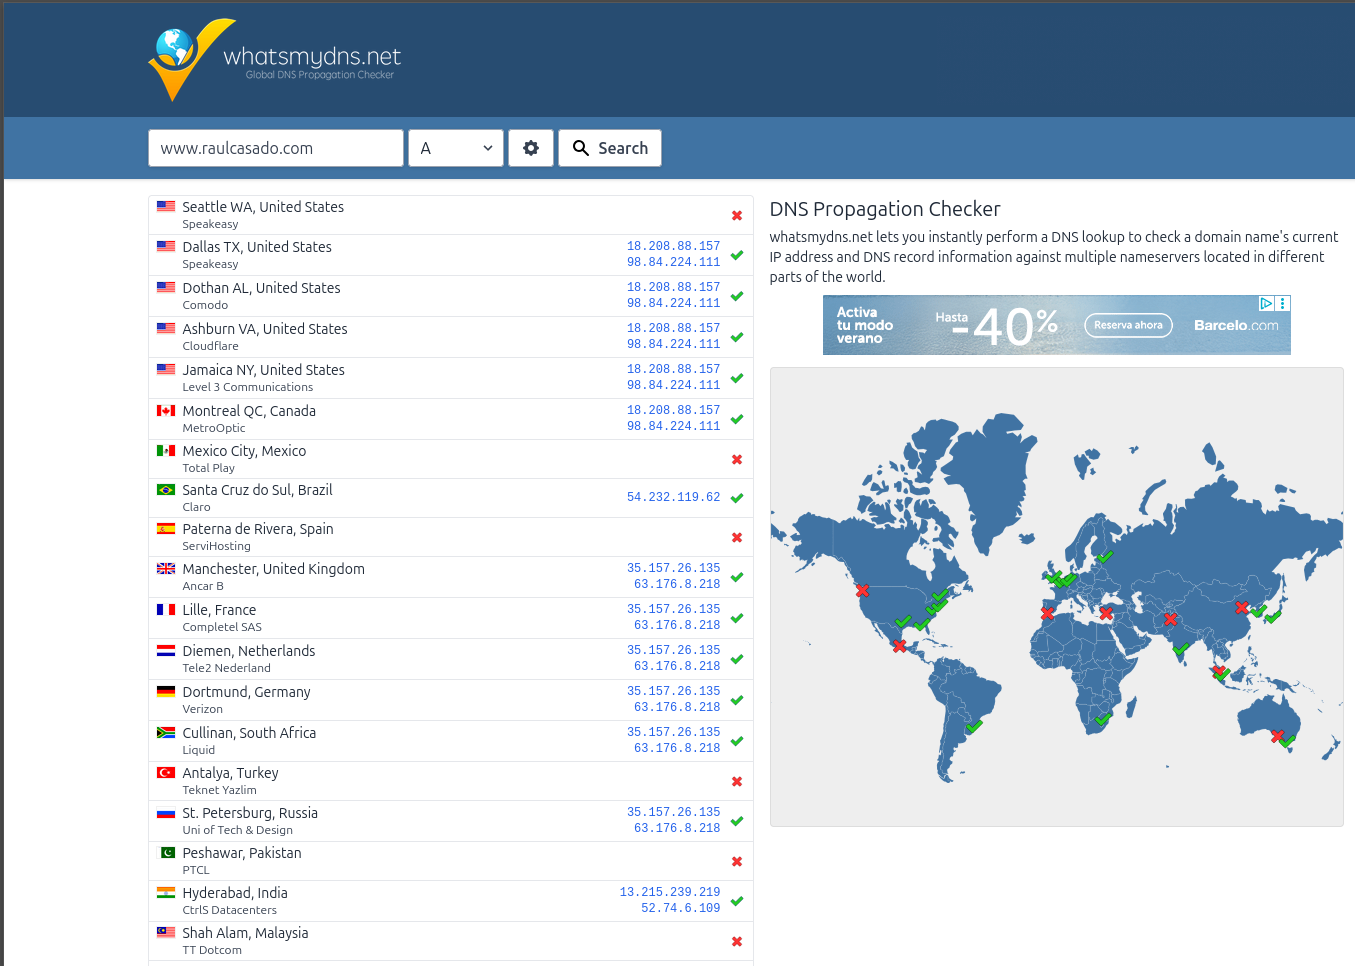
What Netlify did behind the scenes:
- SSL/TLS Certificate (HTTPS)
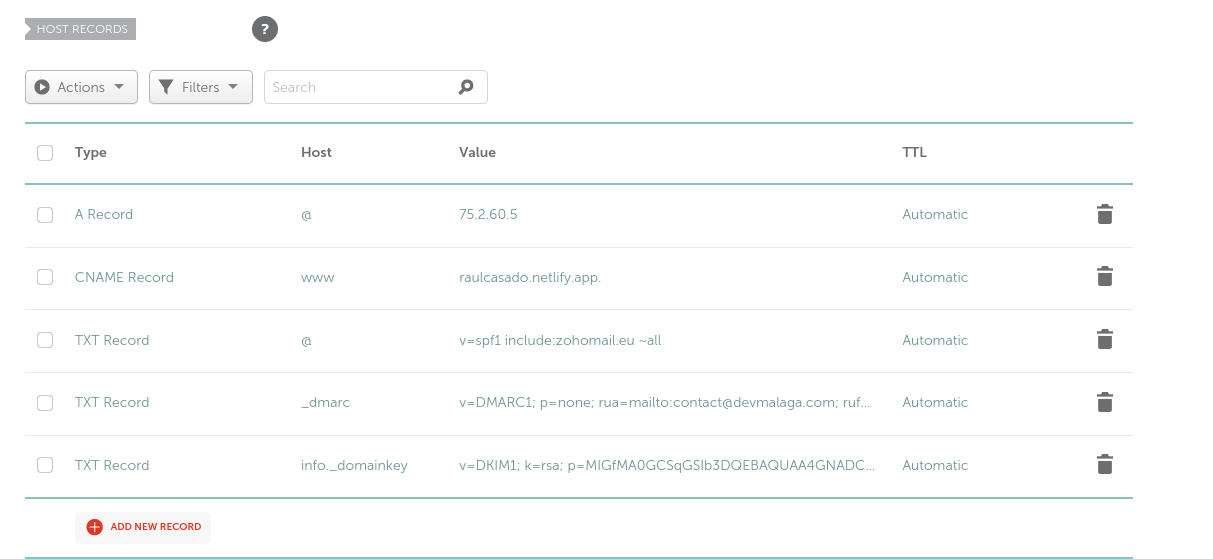
- DNS Records (A, CNAME)
Netlify automatically configured the necessary DNS records for my domain to point to their servers. This includes an A record for the root domain (raulcasado.com) and a CNAME record for the www subdomain (www.raulcasado.com).
Here you can see a screenshot of the final DNS configuration in Namecheap:
And here you can see the final result of the DNS configuration:
raulcasado.compoints to Netlify’s IPwww.raulcasado.compoints toblog-raulcasado.netlify.app
You can verify this with the dig command:
dig www.raulcasado.comUseful tools for DNS and SSL verification:
- whatsmydns.net - DNS Propagation Checker
- SSL Labs - SSL Test
dig- command-line tool for DNS queries
If you had used Vercel, the process would have been very similar. Vercel also offers automatic integration with GitHub and configures DNS automatically.
The process is practically identical:
- Deploy on Vercel (automatic from GitHub)
- Add a custom domain on Vercel
- Vercel configures DNS automatically
- Wait for propagation
- Done!
How to Get a Professional Email
Having a professional email address (like your_name@your_domain.com) gives you several advantages:
- Credibility: An email with your own domain sounds more professional and trustworthy than a generic one from Gmail or Yahoo. This is especially important if you’re trying to establish a personal or professional brand.
- Control: You have more control over your email and can create custom addresses for different purposes (e.g.,
contact@your_domain.com,support@your_domain.com, etc.). This helps you organize your emails better and maintain a consistent image. - Branding: Using your own domain in your email reinforces your personal or professional brand. Every time you send an email, you’re promoting your domain and, therefore, your website.
- Additional Features: Many email providers offer additional features like cloud storage, shared calendars, and collaboration tools that can be useful for you or your team.
I personally used Zoho Mail for the task of getting my own professional email. It’s an email service that allows you to create custom email addresses with your own domain. Zoho Mail offers a free plan that includes 5 GB of storage per user and the ability to create up to 5 users. I’ve never had any problems with Zoho Mail and I think it’s a good option for having a professional email without spending a lot of money. If you want to know more about how to set up your email with Zoho Mail, you can consult their official documentation. Besides having a generous free plan, I know that if I wanted more features, Zoho Mail offers paid plans starting from 1 euro per month per user, which makes it very affordable for small businesses or freelancers. You can also consider other providers like Google Workspace or Microsoft 365, which offer email services with your own domain, but they are usually more expensive. But to start, Zoho Mail is an excellent option.
Okay, now I’m going to explain from scratch how to create a Zoho Mail account and set up your email with your own domain.
1. Sign up for Zoho Mail
- Go to zoho.com/mail
- Select the free plan (Zoho Mail Lite)
- Enter my domain:
raulcasado.com - Zoho asks if I already own the domain (yes, I had already bought it)
Obviously, Zoho will ask you to verify that you are the owner of the domain. To do this, it will provide you with a TXT record that you must add to your domain’s DNS settings. This is to ensure that you really have access to the domain and can receive emails there.
v=spf1 include:zoho.eu ~all2. Configure MX Records
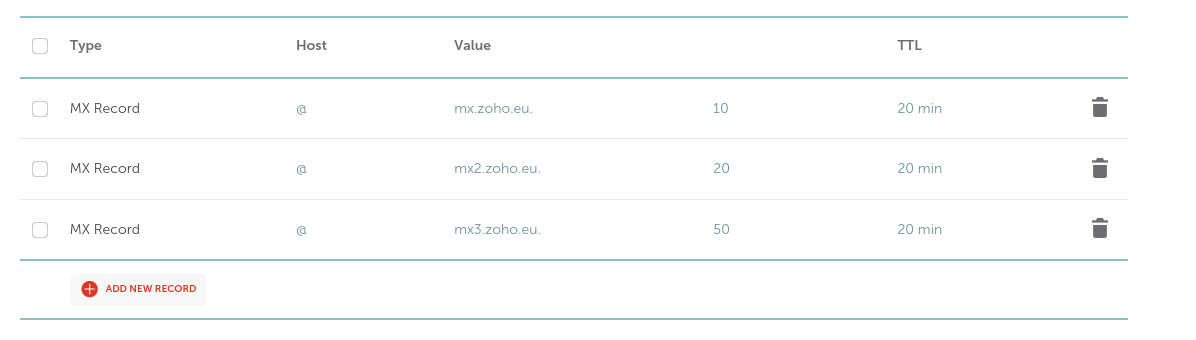
Once you’ve verified your domain, you need to configure the MX records so that emails are sent and received correctly. MX records tell mail servers where to send emails for your domain. Zoho Mail will provide you with the MX records you need to add to your DNS settings.
@ 10 mx.zoho.eu.
@ 20 mx2.zoho.eu.
@ 50 mx3.zoho.eu.
Here you can see a screenshot of the final MX record configuration in Namecheap:
3. Create Users and Aliases
Once you’ve configured the MX records, you can create users and aliases in Zoho Mail. Users are individual email accounts (e.g., raul@raulcasado.com), while aliases are alternative addresses that redirect to a main account (e.g., info@raulcasado.com could be an alias for raul@raulcasado.com).
User: raul@raulcasado.com
Alias: info@raulcasado.com -> raul@raulcasado.com
4. Configure SPF and DKIM
To improve email deliverability and prevent your emails from being marked as spam, it’s important to configure SPF and DKIM records. SPF (Sender Policy Framework) is a system that verifies that emails are sent from an authorized server. DKIM (DomainKeys Identified Mail) is a method of email authentication that uses a digital signature to verify that an email has not been altered in transit.
SPF: v=spf1 include:zoho.eu ~all
DKIM: k=rsa; p=...
Zoho Mail will provide you with the necessary SPF and DKIM records to add to your DNS settings. Once you’ve configured these records, your professional email will be ready to use.
What to do after publishing your website
If you thought you could rest after all you’ve been through, you’re wrong! Publishing a website is just the first step. Once your site is online, there are many more things you can do to improve its performance, security, and visibility. Here are some ideas:
-
SEO Optimization: Make sure your website is optimized for search engines. This includes using relevant keywords, creating quality content, and ensuring your site is easy to navigate. You can use tools like Google Search Console or SEMrush to analyze your site’s performance and find areas for improvement.
-
Security: Implement security measures to protect your website from attacks. This includes using HTTPS, keeping your software updated, and making regular backups. You can also consider using a firewall or a DDoS protection service. If you end up using Netlify, I recommend using their free SSL certificate to secure your website. If you use another hosting provider, make sure they offer security options and SSL certificates, or set it up yourself. If you use a VPS, you can set up your own SSL certificate using Let’s Encrypt or buy one from a certificate authority.
-
Web Analytics: Set up web analytics tools like Google Analytics to track your site’s traffic and understand how users interact with it. This will help you make informed decisions about how to improve your site and attract more visitors. Personally, I don’t recommend Google Analytics much as it collects a lot of data and is a bit invasive, but if you want to use it, go ahead. An alternative if you want to see your web’s performance would be Lighthouse or PageSpeed Insights, which are Google tools that allow you to analyze your website’s performance and get recommendations for improvement. You can also use tools like Matomo or Plausible, which are more privacy-friendly alternatives.
-
Getting on Google: If you want your website to appear in Google search results, make sure it’s indexed. You can do this by submitting a sitemap to Google Search Console and ensuring your site complies with Google’s webmaster guidelines. You can also consider creating a Google My Business profile if you have a local business, which will help you appear in local search results. Just follow the steps indicated on the Google page itself; if you have doubts, you can search for tutorials on YouTube or you can ask me, and I’ll be happy to help.
And finally, don’t forget to test on different browsers and devices to ensure your website looks and works correctly everywhere. This includes testing on browsers like Chrome, Firefox, Safari, and Edge, as well as on mobile devices and tablets. You can use tools like BrowserStack or LambdaTest to test on different browsers and devices without needing to have them physically.
Lessons Learned, Conclusions, and Problems I Had
Publishing my website was a learning experience that taught me a lot about DNS, hosting, and web deployment. Although I encountered some challenges along the way, I was able to solve them and get my site online. Here are some of the lessons I learned and the problems I faced:
- DNS can be confusing: At first, I had trouble understanding how DNS works and how to configure it correctly. But with a little research and patience, I was able to figure it out.
- Hosting is important: Choosing the right hosting is crucial for your website’s performance and security. I’m glad I chose Netlify, as it made the deployment process much easier.
- Don’t be afraid to ask for help: If you get stuck, don’t hesitate to ask for help. There are many online communities and forums where you can find answers to your questions.
I hope this article has helped you better understand how to publish a website and the related concepts. If you have any questions or need help, don’t hesitate to leave a comment. I’m here to help. And remember, publishing your website is just the beginning. There’s always more to learn and improve.